 I went a little crazy baking for my family’s 4th of July cookout. I’ll be sharing some of the goodies I made, but this is the first. It comes with a caveat that I made these past midnight on my second day of baking in a very hot house. I slacked off in the end. =}
The cookies are inspired by these St. Patrick’s Day cookies on Amanda’s Cookin’ and from the Play Dough Cookie recipe at Allrecipes.com. They are indeed edible. In fact, they’re pretty yummy, and I don’t really like sugar cookies.
Making these is easy peasy, but they will be easier to do in a cool house. The dough is largely made of butter and cream cheese, so a warm environment (combined with a lot of handling) makes the dough very soft and somewhat sticky. Also, the consistency of the white dough is more firm than the red and blue, making it tricky to roll evenly if you decide to make swirls (see below). Consider using just red and blue for swirls or working a bit with the white to make it softer.
 Ingredients
- 3/4 cup unsalted butter, softened
- 3 ounces cream cheese
- 1 cup sugar
- 1 egg
- 1 teaspoon vanilla extract (use clear vanilla for a whiter dough)
- 2 3/4 cups all-purpose flour
- 1 teaspoon baking powder
- 1/4 teaspoon salt
- red and blue gel or paste food coloring (* use Wilton’s flavorless red if you go with the paste)
Directions
- Cream butter, cream cheese and sugar until fluffy. Add egg and vanilla and beat until smooth.
- In a medium bowl combine flour, baking powder and salt. Slowly add dry ingredients to the creamed mixture and mix until a soft dough forms. Take 1/4 of the dough and tint it with the blue food coloring. Split the remaining dough in half and tint one section red. Wrap in plastic wrap and chill for at least 2 hours.
- Preheat oven to 350 degrees F.
- Take a chunk of each color dough out of the refrigerator. Keep the rest of the dough refrigerated.
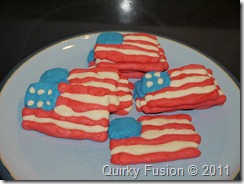
- Roll a small piece of the red dough into a ball (roughly 1”). On a smooth surface, roll the ball into a snake. Pinch off a strip as wide as you’d like your flag to be (2.5-3” inches or so) and place it on your baking sheet. Do the same with the white and place the strip right above the red. Do another strip of red above the white. Make the next strip of white smaller by about 1/3, and place oriented on the right of the flag. Repeat the smaller strips again with red, white, and again. Take a small piece of blue dough, shape it into a square and add it to the upper left side of the flag. If you’d like, you can add tiny pieces of white dough to mimic the stars on the blue of the flag.
- Repeat step 5 until all of the flags are done, leaving roughly two inches between flags.
- Bake cookies for 8 minutes or until lightly browned. Cool on a rack.
Makes roughly 2 dozen cookies.
 Tips:
Tips:
- Take out small amounts of the dough to work with at a time so it doesn’t get too soft.
- Keep a paper towel handy so you don’t transfer one color of the dough to another color (it can be sticky).
- Don’t worry about pressing the stripes together. They just need to be gently touching.
- If you get tired of making flags, you can swirl the colors together and make the cookies shown in the original Play Dough Cookie recipe.


Leave a Reply